|
How To Create Simple In-flight Digital Photographs |
||
|
||
|
|
|
How To Create Simple In-flight Digital Photographs |
||
|
||
|
|
|
|
|
|
|
|
|
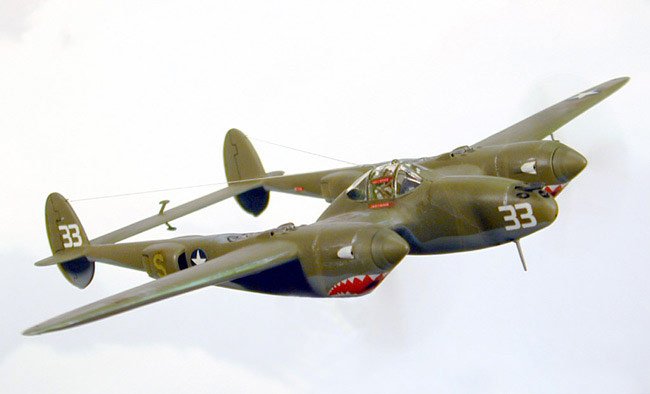
Let me start off by
saying that while I’ve developed these techniques for my personal interest –
simulating in-flight photography of model aircraft – that many of the tools
and techniques I’ll be talking about are directly applicable to shooting
convincing images of cars, ships or armor as well.
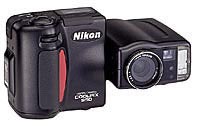
Memory: Do yourself a favor: Get a CompactFlash/Smart Card Memory Card Reader. This will be one of the best investments you'll ever make in digital photography. Card readers save an enormous amount of download time, and if you're doing a lot of shooting around the house or studio and fill up a memory card in the middle of what you're doing, the reader will enable you to keep shooting (download the shots to a Temp file, then delete the card). If you have a camera that uses both CF and SmartMedia, you can purchase readers that accept both. Backgrounds
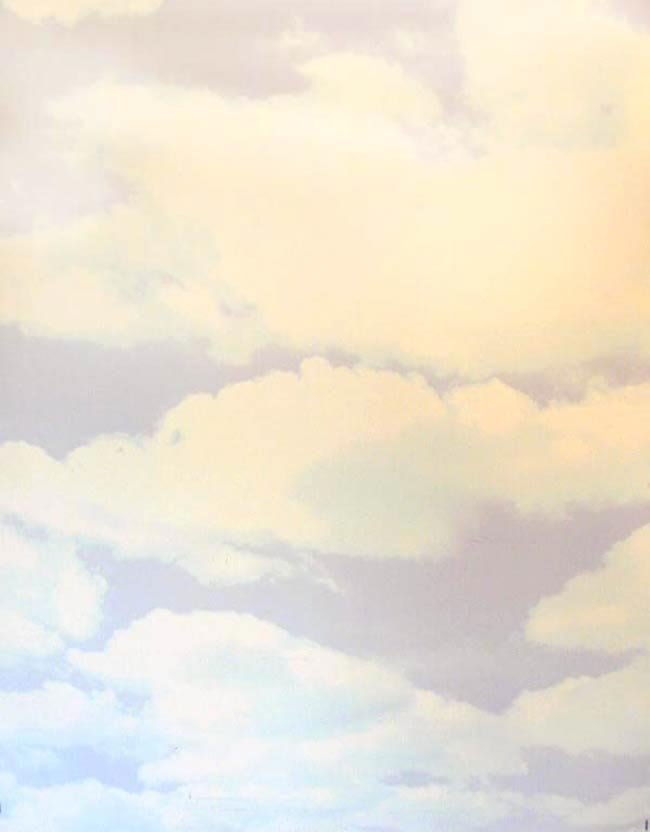
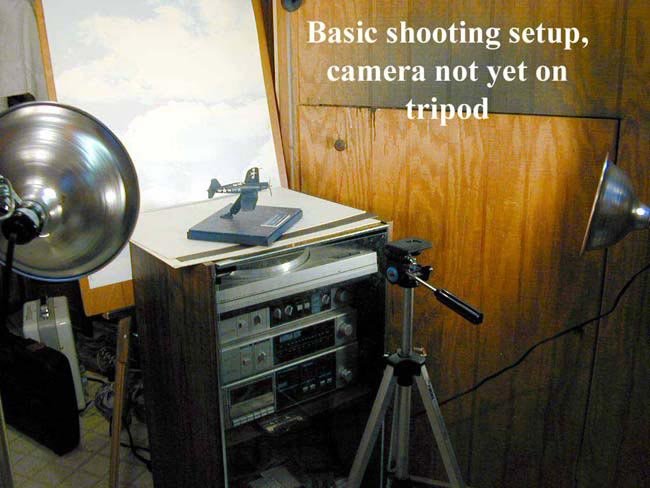
and Setup: For
my in-flight background, I use a cloud and sky poster board that I purchased at
OfficeMax. You tank and car guys can find great scenery backdrops using
calendars, posters, etc. The poster board is stapled to a piece of 1/8-in
plywood for stability and the plywood/poster board backdrop is set in an
artist's easel. Any suitable height table may be used to set your model and base
on. I happen to use an old stereo cabinet, as it is the proper height for my
working purposes. I also incorporate either white or black frame matte board
underneath the in-flight model to either absorb light (black) or reflect it
(white). Matte framing board may be purchased from art or photography framing
stores; ask for remnant, you will not need a full 4 X 8-foot sheet Lighting: I must give
credit where credit is due and without Fred List's excellent article at The
Jackal Squadron website, I probably would not be writing this article at this
moment. Rather than rewriting his article, I shall describe what I use and how I
use it. The prime light source is a high-intensity 300-Watt Incandescent lamp on
a wand, which allows me to adjust the angle and level of the prime source. I
also use two clamp-on 100-Watt Incandescent flood lamps to balance lighting and
kill shadows. I use makeshift stands for the flood lamps and move them about to
produce a nice even lighting on the subject that is already lit by the prime
source. One thing to keep in mind: never try to position your subject 90° from
the light source, you will get harsh reflections and bad overall lighting. Try
using 45° angles or more. If you use a 35-mm SLR and an incandescent light source such as mine, be sure to use a correction filter for shooting under incandescent light. If you are shooting outdoors, shoot in the shade or some other area that gives neutral lighting. A tripod is a must regardless of what kind of camera one uses. Most digital cameras allow for light adjustment of different lighting. Look for a White Balance format in your camera's setup, and then choose Normal, Florescent, or Incandescent.
Composure: And
though this could relate to a modeler's mental condition, in this case I am
referring to the composition of one's subject. Before I cut on all those hot
lights. I set the shot up by moving the model in and out, and the camera up or
down, doing side-to-side jigs as I do. I always use an AC/DC adapter on my
CoolPix, so I have no fear of that dreaded battery drain from leaving the little
monitor on, which is what I use to compose the picture. There are some basic
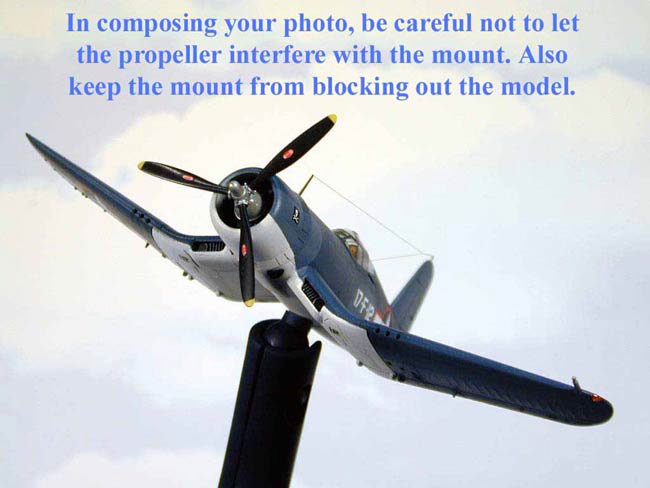
things to keep in mind when composing an in-flight image before shooting the
picture. Always make sure your propeller is not in the same field (directly in
front of or behind) as the model mount, which will have to be cloned out during
image editing. The same goes for
antenna; landing gear, aileron balances, etc. – keep them out of the mount's
field-of-view. You also want to compose the shot using a position that will
later allow you to easily clone out the mount. This can be leaving as little of
the mount showing where it meets the model, or composing so that the mount is
very dissimilar to the model and can be easily cloned out. More on cloning
later. Clear!
Contact! Spinning Props: Okay,
let me tell you up front, there is no digital magic post processing in the
spinning propellers. They are actually spinning! I generally use 1/16-in brass
tubing for a propeller shaft (about a 1-in long section). For my shaft mount on
the fuselage (inlines) or the radials, I use a matching 1-in long section of
3/32-in brass tubing. This allows me to keep the props off of the models during
transportation, thereby saving them from breakage. Then I can insert them at
will. The slightest puff of one's breath will spin most of them, but I use an
old hair dryer (sometimes two dryers for twin-engine models), in which the
heating elements have been removed. I use a high setting to spin them with ease
(or sometimes have my son, Addison handle dryer duties, while I man the camera).
But if any of you are ever at my house, you can play too!
Post
Processing: All
of the photographs and screenshots in this article were done in Adobe Photoshop
7.0, but you do not need a graphics program that powerful to achieve the same
results, Adobe PhotoDeluxe will get you by fine - it has all the basic tools I
use in Photoshop for simple graphics editing. You will be primarily using the
following tools, regardless of your graphics program (Photoshop, Paint-Shop Pro,
Corel PhotoPaint, etc): Level
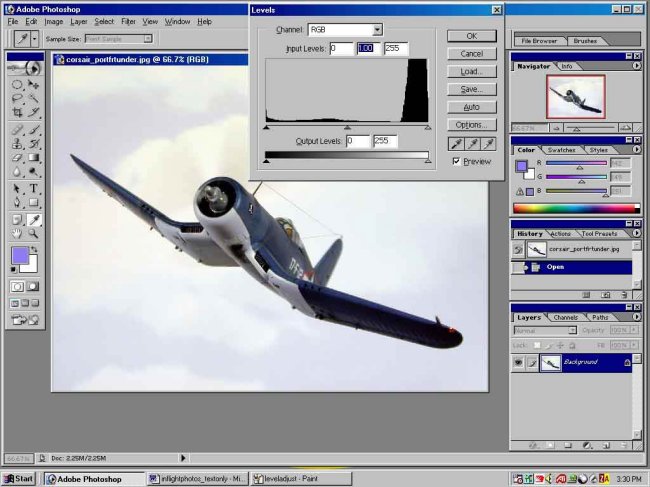
Adjustment:
I always like to manually adjust my lighting. Most of the time the light and
dark balance are slightly off and I balance the levels, and then usually raise
the mid-tones to further balance the subject's lighting. Even though I have the
white balance set for Incandescent Light, the lighting always adds a touch more
yellow than I like, so I subtract some yellow from the Color Balance. Two
screenshots are shown here; one showing where the level adjustments are found
and a second showing the level scale. On the Level scale, the arrow to the right
controls white (light) balance and the arrow to the left controls black (dark)
balance. The arrow in the middle controls the mid-tone adjustments. The bottom
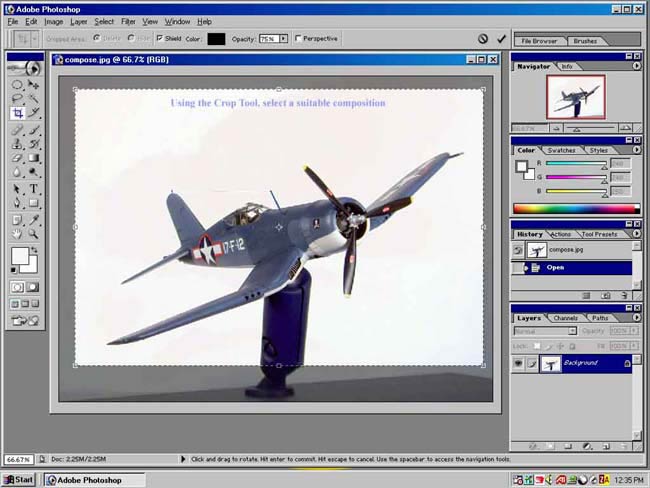
arrow controls contrast intensity. Crop
Tool:
This helps you to get the subject even better composed and allows you to
eliminate unnecessary background clutter in the photograph. It is a rather easy
tool to use and you should have the hang of it pretty quick. One thing worth
mentioning, however, always check your six on the screen size or print size,
whichever you are going for. Bear in mind that sizing up a cropped image works
okay for the Web but will pixelate more when subjected to print. For those who
do not know, graphic editors work with photographs that have been turned into
digitalized images either by scanning a standard print or a photograph from a
digital camera. These continuous-tone images have been converted into a series
of small squares, or elements, which are called pixels. Cropping an image and
enlarging it will increase the size of the squares, thereby rending your
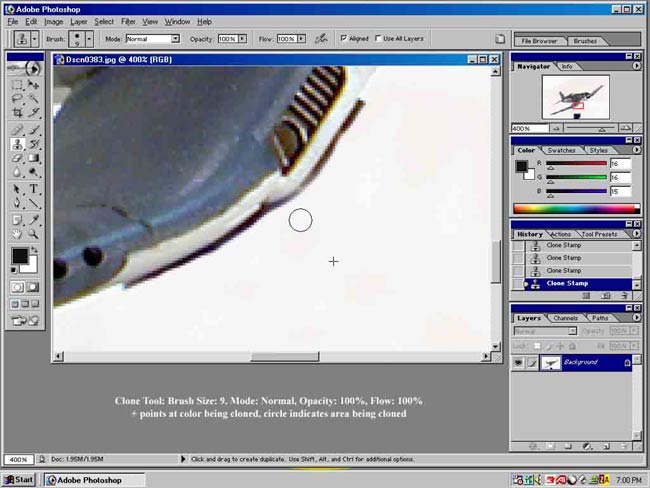
photograph with little pixel squares. Clone
Tool:
This is one of the most usable tools in any graphics editor. Let it be your
friend! Learn how the different sized brushes work in the program you use. Learn
how the set clone spot moves with the brush, practice, practice; practice some
more. To minimize the cloning task
on the model mount, try to keep your in-flight mount to a minimum, I mount my
in-flight models on modified hobby magnifier pieces that can be purchased from
Magnistitch, a mom and pop company in Birmingham, Alabama that make many sewing
and craft magnifiers and aids. If you use brass rod or acrylic rod, your task is
pretty easy also. While editing, I will start with a fairly large brush size (65
as a rule) and clone out the mount working from one side to the next until I
have removed all but a little of the mount hanging below the model. I will then
switch brush sizes, zoom in and eliminate the mount out completely. Since the
smaller brushes sometimes will produce sharper clone lines, I only use them for
final cloning. I also pick a slightly larger sized brush and re-clone around the
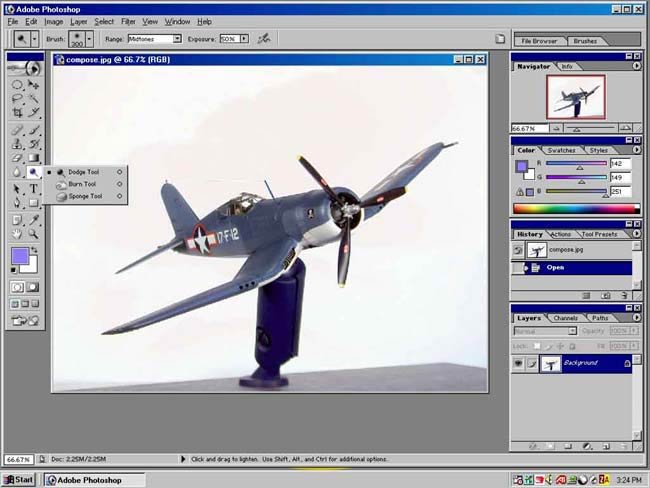
sharply cloned area to blend things better. Burn
and Dodge Tools:
These both can aid in balancing light over a specific area. The Burn Tool makes
an area darker; the Dodge tool lightens the area within the brush. Again (and
these tools take more practice than the Clone Tool) learn to adjust the Brush
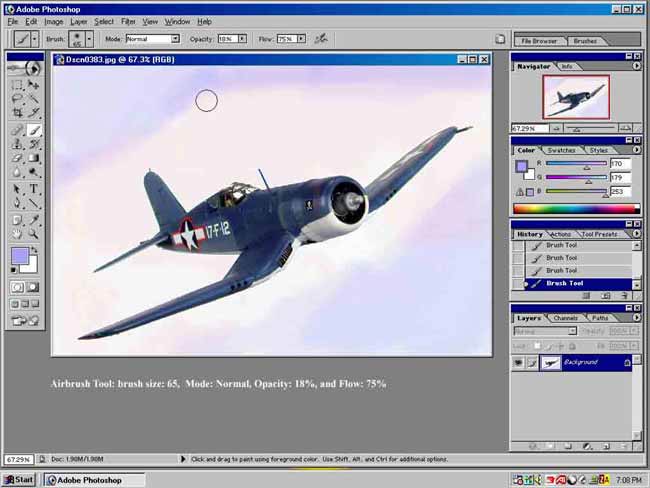
Size, Opacity, and Flow to suit your needs. Airbrush
and Brush Tools: These
tools are in most simple graphics editors also and worthy tools they are, but
they take some getting use to. Again, nothing beats practice. In Photoshop I can
right click and select the color wanted using the Eyedropper Tool, which selects
a color in some surrounding area. Hint: Much like when you paint with a
“real” airbrush, keep the flow light! Never set the airbrush Opacity or Flow
for 100%; try to find a happy medium and learn again how to control your various
sized brushes. Photoshop and all editors allow one to zoom in, so feel free to
do so. Your airbrush can also simulate smoke from a jet's exhaust, vapor trails,
flame and smoke from a burning plane, etc. Blur
Tool: Although
not needed in the simple in-flight shots, the Blur Tool is excellent for
simulating heated exhaust from a jet. It, like all others, works using different
sized brushes, and intensity can be regulated in most editors. Finished
Product: Total
time expended: 15-minutes studio set up, 45 minutes composing and setting model
and lights and shooting 18 photos (not all of this model) in a 1024 X 768 size (XGA
FINE Mode in the CoolPix 950). Next comes the “real work”, post processing
in Photoshop. Most individual shots take from 10-15 minutes, up to maybe 30
minutes on odd-angled shots. So one is looking at a finished product in a couple
hours time. Hey! That's a lot
better than I do with models :>).
So try it! You may just end up with some pics hanging around your house like I do. You can get cheap 4 X 6 print frames from Ritz and 4 X 6 Photo paper isn't all that expensive either. Another thing to mention about printing digital photos: if your graphics editor allows you to save the print in a CYMK color mode, do so before printing. RBG mode works best for web work, so save the picture in both formats but print in CYMK, which give truer color tones in print format. Caz Dalton, IPMS/USA #34765
|
|
||||||||||||||||||||||||||
Photos and text © by Caz Dalton, IPMS/USA #34765
|
|