|
I have received inquiries about how
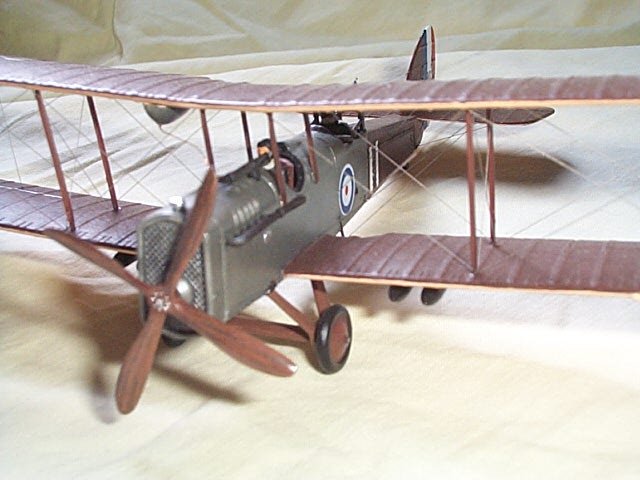
I rigged my DH-4 on the ARC
gallery lately..... so I have decided to post an explanation here in order to encourage anybody out there ,that has
been thinking about tackling one of these little buggers, but was
discouraged by the rigging element of it .
I don't pretend for a minute to be an expert, nor do I claim that
this technique is the right one to use, I simply offer what I have
developed on my won on the subject, but at least it will give some
one a place to start .
1-Planning -
-First I look at the model in the box and decide where I am going to
run the
rigging with the help of any pictures or drawings I can ... I try to
run
the rigging exactly in the same place as the real one, but if it is
going
to be impossible to put it in the same place then it is better to
compromise a
little if you have to, and move it ... the important thing is that
it "looks
right " especially in this 1/72 scale.
2 -Drilling -
-Once I have figured out where the line is going to go, then I
pre-drill
holes though the plastic with a small hand pin vise with as small
drill bit ... the holes have to be
clean and free of plastic chips.
3- Model Assembly and Paint-
-I assemble the plane and paint (on the DH-4 I assembled and painted
the
main fuselage, bottom wing and the top wing separately)
apply any camouflage lozenge decals and roundels if the rigging is
going to
go though them (like on a hawker furry for example) ... keep paint
sample for touch ups if you are mixing, of course.
4 The Line
- The line I use is a thin thread made of vinyl called
"invisible thread"
you can buy this at anyplace where sewing supplies are sold ...do
not use
polyester because in time it will unravel and look hairy and dusty !
5- Starting to Rig
- Once the plane is assembled and painted ... simply find the place
where
you want to start your rigging (like the edge of the fuselage )
apply a very
small drop of crazy glue (CA instant glue ) in the pre-drilled hole,
take
a length of thread with tweezers, place the end in the hole that has
the
glue and wait for it to dry (a few minutes). It is very IMPORTANT that your first hole with glue dries SOLID
because
you run the thread though the other holes, you will need to pull and
apply
some tension to the thread to stretch it a little so that it looks
right
... so the glue at the first hole better be totally dry!
6- RIGGING
-Try to rig as much as you can in one piece of thread. It will be
faster
and easier in the long run...
On the DH- 4 I started at the base of the fuselage ... waited 5
minutes for
the glue to dry ... then I ran the thread up though the wing (second
spar
front ) over and back down though the wing (second spar back)... to
bottom
wing (third spar back) ... down under and through the wing back up
(second
spar front)... etc when I get to the outer edge of the wing I hold
the
thread with a small piece of thread and apply very small amounts of
glue to
the holes where I have run the tread with a tooth pick in order to
secure
the thread in place ...
once the glue has dried I take an X-Acto knife with a fresh no.11
blade and
I cut way the extra thread (like on the top of the wing).. etc.
Take care to cut only the thread and dry glue as close as possible
to the
paint, but not dig into it
repeat the rigging pattern in reverse until you achieve the
crisscross
pattern that you want
7 -Touch-Ups
-Once you have accomplished the rigging you set out to do and have
smoothened the surface where you have cut the glue and thread ...
apply a
touch of paint to the wing surface etc ... and VOILA! after you
finish
decals and details the plane is done .
Hope that this helps.
Fern
|
|